This article will cover how to rebuild a gast rotary vane compressor. Also known as rotary vane septic are pumps, they used on septic systems and are very durable and long-lasting. When they do finally need to be serviced, most of them can be rebuilt. Here, we are going to go through what you need to rebuild a unit and how to check it’s still viable. You can either rebuild them in place or tank them in the garage and rebuild them; either way is fine.
- You will need the proper rebuild kit for your pump. This is normally found on top of the unit. This rotary vane septic air pump in the picture is not the one being rebuilt, but to show you what to look for a lot, of people give the motor model and that changes every two years or so and doesn’t really help.

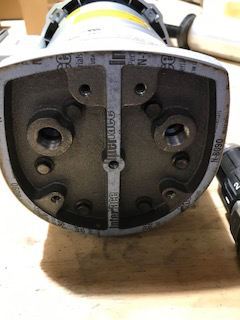
The Model Number is the top number listed under the model heading. For this pump it is 1023-101Q-3G608X. Gast has been known to change model numbers many times, so we use the first 4 digits to identify which pump you have. In this case, it is a Gast 1023 Rotary Vane Septic Air Pump.
- Once you know the model number and have your kit, that we have found for you below by model number, you can rebuild your rotary vane septic air pump.
Gast 0523: Gast 0523 K478 Septic air pump rebuild kit
Gast RV03: Gast RV03 Septic air pump rebuild kit
Gast RV05: Gast RV05 Septic air pump rebuild kit
Gast AT05: Gast AT05 Septic air pump rebuild kit
Gast AT03: Gast AT03 Septic air pump rebuild kit
Gast 0823: Gast 0823 Septic air pump rebuild kit
Gast 1023: Gast 1023 Septic air pump rebuild Kit
3. You will need the proper tools to accomplish the rebuild:

- 11mm socket or 7/16 for the outer housing bolts
- 10mm socket or 7/16 for the inner housing bolts
- Socket diver
- Silicone to hold the gasket in place when placing the outer housing on so you don’t have to fight it
- Razor blade to remove old gasket material as it will be stuck on the metal.
This is a short list of all the tools you will need to repair your Gast Rotary Vane Septic Air Pump.
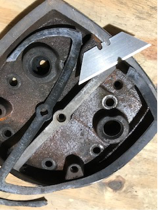
- You will need to get the internal filters off out of the unit. You don’t want to just try and undo them, you run the risk of breaking them, as they are hollow. You want to first tighten them very slightly, and by that, I mean just so they move a couple millimeters if that.
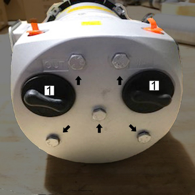
We've drawn arrows to each of the bolts you will need to remove to replace your Gast Rotary Vane Septic Air Pump damaged carbon vanes.
- Next you will remove the outer chamber. You will need the 11mm socket to achieve this. Remove all the bolts. Then gently tap on the top and it should come off. Place the bolts in the housing as to not misplace them.
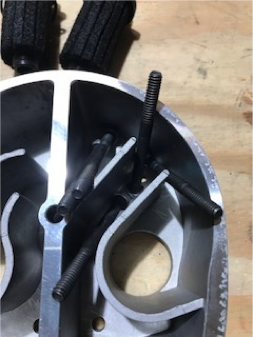
This image shows the bolts removed from the outer casing of your Gast Rotary Vane Septic Air Pump.
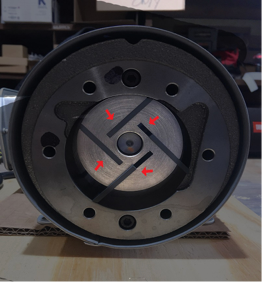
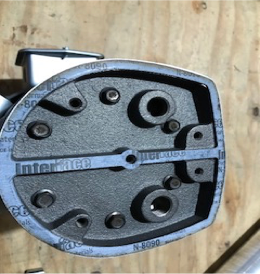
- To remove the counter face plate, you will need a 10mm socket. You will need to remove all of these bolts then gently pull on the plate to remove it. If the orange spacer gasket is stuck to this plate, do not remove it. You will curse yourself if you do, it doesn’t need to be replaced 95 percent of the time. It's time consuming and a real pain to get the new one to sit and stay in place. Trust me I’ve done this thousands of times. If it's stuck to the main counter face leave it as well.
This photo shows proper gasket installation on your rebuild Gast Rotary Vane Septic Air Pump.
- You now are in the heart of the unit where the vanes are. The vanes will most likely be shattered and in pieces. Sometime because of the way the vanes break one will break and the following one will not. This happens because vanes don’t all wear at the same rate; we are talking thousands of an inch. So, the vane that doesn’t break catches the one the one that does and shoves the vanes into the rotating part and jams it. Sometimes you can get it out pretty easily and other times you have to take a hex wrench and loosen the counter face. You will want to check the inside for carbon pieces and make sure they are all removed. DO NOT SPRAY ANY KIND OF LUBRICANT INTO THE PUMP. The oils will destroy the vanes. It is meant to run dry with the bearings sealed.

Make sure you put the carbon vanes in correctly, or they will not create a proper vacuum and can jam, ruining your rotary vane septic air pump.
- Replace the vanes in the slots. They are cut a certain way and the vane is also cut in the same way so it should fit flush in the pump. A lot of the ¼ HP Gast pumps have an orange spacer gasket inside and it gets stuck to either the end plate or the rotor housing. DO NOT TRY TO REMOVE THIS, it is a pain to get off and a pain to get to set correctly. In our experience, and we have rebuilt thousands of these pumps, it is not necessary to remove this.
This graphic shows proper vane alignment for your rotary vane compressor.
- The backing plate gasket will need to be removed. It is normally stuck to the metal very well and you will need a razor blade to remove it fully. You will also want to check the lip of it, where it meets up with the rotor housing, to make sure it is clean and will slide on smoothly. We sometimes sand this down lightly to knock off any rough edges with 600-1000 grit sand paper. Scotch bright will work also.
We use a new razor blade to scrape off the old gasket, ensuring a proper seal.
Once the backing plate is clean, you can put the new gasket on. We cheat and put a little silicone on where the gasket goes, so it stays in place and we don’t have to fight it.
Dap sealant ensures the new gasket adheres effectively, increasing the vacuum and lifetime of your pump.

This image shows a correctly installed gasket sealed with DAP.
Once the gasket is on you can put the counter face back on and put the bolts in with the 10 mm driver. It's important that there are no gaps and that the plate is sitting flush with the rotor housing. Once it's sitting flush, you can tighten the bolts down. It's not a car tire, it only needs to be tightened to 115 inch pounds of torque. That is just snug. If you tighten it too much, the counter faceplate and the rotor will touch and bind the pump up. So just tight, not all your might into it. After you have this bolted on, you will want to do a test run and make sure it is running smooth. It should start right up; you don’t have to run it long. 5-10 seconds is enough. Make sure you have good pressure and quickly press and release your finger over the inlet and outlet. Make sure you have good vacuum and pressure and then turn the unit off again. It should slowly stop rotating; 2-3 seconds until it stops all the way. You don't want it to immediately stop.
Now you can put the outer housing on. Start with the center bolt to center it and then put the other bolts in place. Once they're all on, you can replace the internal filters and your rotary vane septic air pump is ready to go!
Your all done with the rebuild when your able to screw the bolts back onto the chamber face!
